Installing Windows Admin Centre on a domain server
Posted on 25 January 2019 by Beaming SupportWindows Admin Centre is a very powerful tool that can be used to control Windows servers and Windows 10 PCs from a webpage.
The tool can be used to accomplish many tasks in one place, including: add and remove roles and features, install Windows updates, view events and files and even open a Powershell window in the browser. You also have access to services, scheduled tasks and the registry.
Installation
The installer is very simple, but there are a couple of things that you need to be aware of. Firstly, you can only install the Admin Centre on Windows 10, Server 2016 or Server 2019. Also, you cannot install the program on a Domain Controller.
Download the installer and run through the setup, press next until you reach the option ‘Allow Windows Admin Centre to modify this machine’s trusted hosts settings’. This is on by default and should probably be left on to avoid any issues later on.
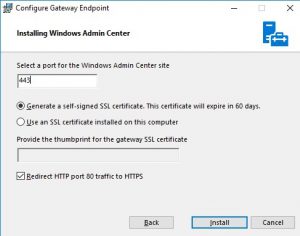
The next page will give you options to configure. Depending on your setup, you can either leave the default port of 443 or change it to something not usually used, E.G 6517. You can choose to use a self-signed certificate or use one you already have. I would suggest ticking the ‘Redirect HTTP port 80 traffic to HTTPS’ option if you have nothing on the server using port 80 already.
Lock down access
Once the installer finishes, you can then login to the Admin Centre via https://servername:port E.G https://WACserver:6517. Click the cog in the top right and select the ‘Access’ option. Here you can select who can access the Admin Centre.
The next step is to go to your domain controller and setup two groups. One is for admins and the other is for users, so call them something simple to make life easier later Eg. WACAdmin and WACUsers. Add your administrator accounts to the admin group and if needed, add users to the users group.
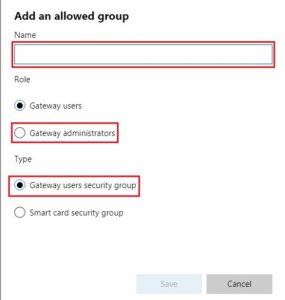
Back in the Admin Centre Access tab, choose ‘+Add’. Write your admin group details in here, Eg. domain\WACAdmin and select ‘Gateway administrators’ as the role and ‘gateway Users Security Group’ as the type.
Next, click ‘+Add’ again and write in your users group. This time select ‘Gateway Users’ and ‘Gateway Users Security Group’ and click Save. If you do not follow this second step, then anyone who has access to the URL has read only access to the data.
Now if a user that is not in either security group tries to access the Admin Centre, they will be presented with a message telling them that they are not authorised to access the page.
Ready for the next step?
Start adding and controlling servers.
Stay connected
Beaming’s monthly email bulletin will keep you up to date with the latest tech, cyber security advice & tips to make the most of your connectivity.

