Add two factor authentication to a VPN using Sophos UTM: Part two
Posted on 18 February 2019 by Beaming SupportAdd two factor authentication to a VPN to help make sure that only those who should have access to your corporate network are able to log in to it remotely.
Once you have set up your SSL VPN with 2 factor authentication on the Sophos UTM, follow the below steps to set up the SSL VPN client and use 2 factor authentication for logging in.
This can be used from a Windows or Mac device.
- Log in to the UTM user portal on the device you would like to install the VPN on.
- Once logged in, go to the ‘Remote Access’ tab and download the client for the device.
- Once the client has downloaded, open it and click Next, then I Agree.
- Click Install and if you get a further popup, click install again.
- When the installer has finished, click Next and Finish.
- You will notice an icon appear on the taskbar that looks like a traffic light. This is the VPN client software now running on the device.
- Open the Google Authenticator App on your phone and make a note of the code. Note that this changes every 30 seconds.
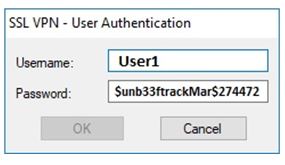
8. Double click the traffic light icon to connect to the VPN. This will prompt you for login details. Your login details will be DomainUsername – DomainPassword + 2FAcode E.G. If your server details were User1 and $unb33ftrackMar$, your VPN details would be User1 and $unb33ftrackMar$274472 (in this example).
9. The traffic light icon will then turn green and Windows will give you message that it is connected.
10. To disconnect from the VPN, double click the icon and choose Disconnect.
Found this useful?
Beaming is an Internet Service Provider for businesses so we’re experts in networking and all-things connectivity. Subscribe to receive our how-to guides, cyber security advice and business research direct to your inbox once a month.

