Open Microsoft Access Database in PHP with PDO
Posted on 21 January 2019 by Beaming SupportCreating an Access database
To begin with, you are going to need to create a database file via Microsoft Access and then save it to an easily accessible area for you. Once you’re happy you’ve got the data you need e.g. a users table with some basic columns, then we are ready to make our DSN.
We saved this file to My Documents. We would recommend that you save the file as a 2003 MDB file for ease of use and less likelihood of problems down the line, but we’re showing you how to use an accdb as an example to prove that you’re not limited to convert your files backward to a mdb file.
Turning a database into a DSN
What is a DSN?
A data source name (DSN) is a data structure that contains information about the database file we have created, which is accessed by an Open Database Connectivity (ODBC) driver.
Creating DSN
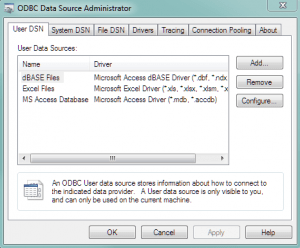
On Windows, go to your control panel, select Administrative Tools >> Data Sources (ODBC). This will open a window allowing you to create your own DSN.
The tab that is open by default (User DSN) will allow you to create DSNs only visible and usable by the current users logged into the machine, which will suit our current needs for a development database. For full fledged DSNs I’d recommend System DSNs on a server.
In order to add a DSN, you should select ‘Add…’, which should list many of the below.
If you are greeted with only one option (E.G. MySQL), then you will need to instead run the 32bit version of ODBC Data Source Administrator, this can be located within:
C:\Windows\SysWOW64\obdcad32.exe
Before opening please ensure the current 64bit version is closed, then click Add… again. From here we want to open a Microsoft Access (*.mdb) file.
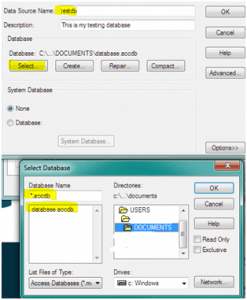
Now we will name our DSN “testdb” which we will use later in our PHP code. Next, we’ll select our database which was saved to our documents file earlier. Please note that the “Database Name” search will be *.mdb, which you’ll need to change to *.accdb if you didn’t save your file as an MDB file. Double click “DOCUMENTS” and select your database. Now press OK twice, and we have our DSN!
Establish Connection with PHP
For this we are going to use PDO to establish the connection, as MySQLi will not allow us to open a connection via the odbc driver. You can use the below function which will return
Opening ODBC connection with PDO
public static function connect(){
$conn=false;
try {
$conn = new PDO(“odbc:testdb”, “”, “”);
} catch (PDOException $err) {
print_r($err->getMessage());
}
return $conn;
}
Using Our Connection to SELECT some data
if($db = self::connect()){
$db->setAttribute( PDO::ATTR_ERRMODE, PDO::ERRMODE_WARNING );
$SQL = “SELECT * FROM Users WHERE username=:username”;
$attr= Array(“:username” => “test.user”);
if($prep = $db->prepare($sql)){
if($prep->execute($attr)){
if($results = $prep->fetchAll()){
echo “<pre>”.print_r($results, true).”</pre>”;
}
} else {
echo “Failed to execute”;
}
} else {
echo “Failed to prepare”;
}
} else {
echo “Failed to open DB connection”;
}
The above shows our function which is used for connecting to our ODBC database via PDO. This can be turned into useable code which is demonstrated below the function. In this snippet of code we are turning our function into a variable which is used to prepare our SQL, execute the sql + array attributes and also return the results in a readable manner.
From here you can build upon your database to create your website.
Stay connected
Beaming’s monthly email bulletin will keep you up to date with the latest tech, cyber security advice & tips to make the most of your connectivity.
You have reached the entry limit


