Use a local printer in a remote desktop session
Posted on 21 August 2020 by Beaming SupportWindows allows you to use a local printer in a remote desktop session
As well as use a local printer in a remote desktop session, you can also make use of your storage devices e.g. Hard drive, Shared drive and USB.
Step 1:
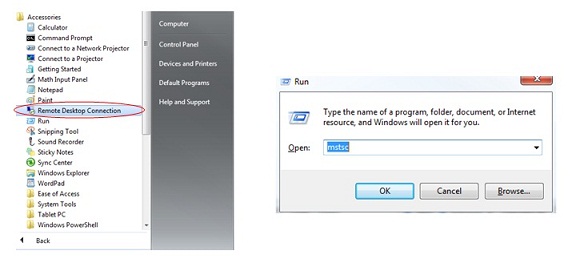
Open Remote Desktop Connection from:
‘Start -> All Programs -> Accessories -> Remote Desktop Connection’.
This is applicable to Windows 7. The window can also be accessed by using the ‘Run’ command ‘MSTSC’.
Step 2:
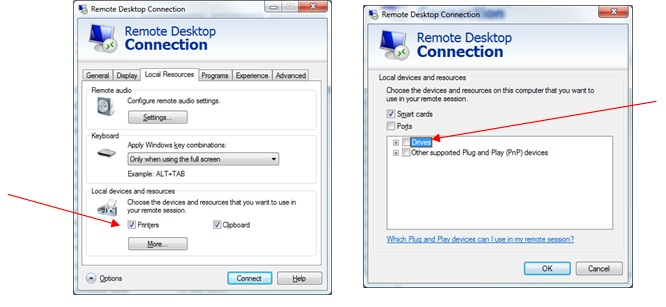
The below window will then appear. Please select ‘Options’. This will expand the options available to you. Then select the ‘Local Resources’ tab. On this tab at the bottom there is a section on ‘Local devices and resources’. There is a ‘Printers’ selection box that when ticked allows your local printers to appear within the server. Also when selecting ‘More…’ there is an option to tick ‘Drives’. This allows you to access drives from your local desktop within the server. They will appear as network drives in your ‘My Computer’ area. Printers will show up in the ‘Printers and Faxes’ window with their names followed by ‘Redirected’ and a number. When next logging in to the server after the change they should all be showing. As long as these options are ticked then these should always load. Should you still be having issues getting them to appear in the server you may need to update your computer with .NET Framework 3.5 update.
How Beaming supports remote workers

- Remote Working
- Broadband
PR Artistry
PR Artistry is a PR and content creation company. Since 2017 everyone at PRA has worked remotely therefore a central point for the company’s connectivity & communication is essential.

- Broadband
- Remote Working
The Adastral Group
With one eye always on the future, the Adastral Group knew there was likely to be a move towards the virtual delivery of training, but they couldn’t have predicted quite how quickly this would happen.

- Hosted Voice
- Telephony
- SME
Abbotprint
An ageing ISDN telephone system and a desire to be prepared for the future prompted the move to cloud voice technology for this innovative printing firm.

- Remote Working
- Broadband
PR Artistry
PR Artistry is a PR and content creation company. Since 2017 everyone at PRA has worked remotely therefore a central point for the company’s connectivity & communication is essential.

- Broadband
- Remote Working
The Adastral Group
With one eye always on the future, the Adastral Group knew there was likely to be a move towards the virtual delivery of training, but they couldn’t have predicted quite how quickly this would happen.

- Hosted Voice
- Telephony
- SME
Abbotprint
An ageing ISDN telephone system and a desire to be prepared for the future prompted the move to cloud voice technology for this innovative printing firm.

